Cookbook:Ploting Object Positions on a Map Image
Problem
You want to plot the position of objects or events in the BF2 game world on a map; for example, you want to plot the positions of player deaths, the positions of control points, etc.
Solution
There are three parts to this recipie. . .
Getting a copy of the HUD map

First we have to get a hold of an image of the BF2 map we're interested in and convert it into a format we can use as a base to plot on top of.
The directory Battlefield 2/mods/bf2/Levels contains subdirectories for each map available as part of the standard "bf2" mod (the retail game). On a computer that has the client version of BF2 installed (not just a dedicated server), go into that directory and find the subdirectory for the map you want; for purposes of illustration, we'll work with Gulf of Oman, which is in the directory Battlefield 2/mods/bf2/Levels/Gulf_of_Oman; change into that directory.

Inside it you should see a file called client.zip. Unzip that file, and decend into the resulting new directory. Inside it, go into the Hud, then again into the Minimap directory--so now you should be in the directory Battlefield 2/mods/bf2/Levels/Gulf_of_Oman/client/Hud/Minimap. In this directory are two files, commanderMap.dds and ingameMap.dds. Get copies of these.
These files are in the "DDS" or "DirectDraw Surface" format. This format is designed for high-performance use by 3D accelerators--which is nice, but we need to change them into a format we can actually do something with, like PNG or JPEG. Get a copy of the DDS Converter program, and use it to convert these files into PNG or JPEG format.
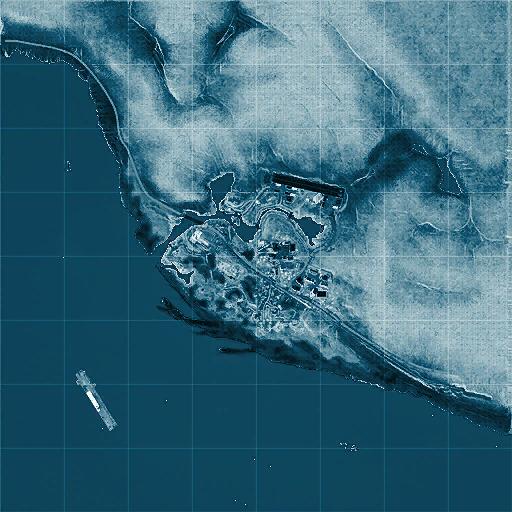
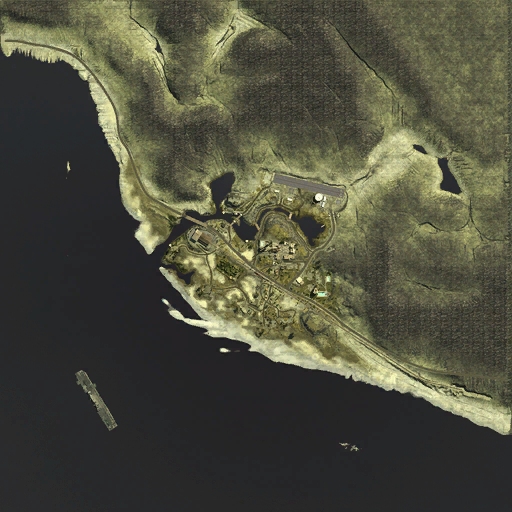
Once you've done so you can see what the differences are between the two images: both are 512x512 pixels in size, but commanderMap.dds is a monochrome satellite view, whereas ingameMap.dds is a full-color aerial view. Depending on what you're doing, you may want to select one of these images over the other. We will refer to the map image you choose as the "HUD image" in the remainder of this recipie.
Converting game coordinates to HUD image coordinates
See the page on BF2 Coordinates for detailed information about the Battlefield 2 coordinate system. We need to convert coordinates in this system (which typically runs from -1024 to +1024 along each dimension) into the coordinates of a specific pixel in our 512x512 HUD image--so we need to do some scaling. Additionally, we're going to be plotting points on the HUD image using the Python Imaging Library (or "PIL"), which addresses pixels in an image with the vertical axis reversed from how BF2 game coordinates work.
Here are the formulas that will work to convert coordinates on a map with a world size of 2048x2048 (i.e. all basic BF2 maps except Strike at Karkand) into the specific PIL coordinates for the pixel on the HUD image that corresponds to those game coordinates:
- XHUD = XGame / 4 + 256
- YHUD = 256 - ZGame / 4
Note that PIL uses X and Y axes, whereas BF2 bizarely uses X and Z. We throw out the BF2 Y coordinate, which represents altitude, because we're doing a 2-dimensional plot.
The mathematics for deriving these conversions should be intuitively obvious, and are left as an exercise for the reader (I always wanted to say that. . .).
Plotting points on the the HUD image
Exactly how you plot points on your HUD image will really depend on what it is you are trying to accomplish, but here's an example of how to use PIL to plot points on the image corresponding to tuples of game coordinates contained in a list. Note that PIL must be installed in your Python interpreter for this to work; also note that this is not written to run as part of BF2--it's written as a stand-alone program.
[[File:Eye_of_the_North_Retail_3D_Box.jpg|200px|right]]

 import Image, ImageDraw, ImageColor  # These modules are part of PIL

 def plotPoints(baseImage, resultImage, gamePoints):
     # Convert a set of 3-tuple game coordinates (X,Y,Z) into pixel coordinates
     pixelPoints = []
     for gamePoint in gamePoints:
         pixelPoints.append( (gamePoint[0] / 4 + 256,
                              256 - gamePoint[2] / 4) )

     # Read in the base image file and initialize it for drawing
     hud = Image.open(baseImage)
     drawable = ImageDraw.Draw(hud)

     # Plot points at each set of pixel coordinates
     drawable.point(pixelPoints, fill = ImageColor.getrgb("red") )

     # Write our completed image to disk. We use PNG here because individual
     # pixels of a different color tend to not show up well in JPEGs.
     hud.save(resultImage, "PNG")
Here's what the output of this code looks like; the data for this image is a set of coordinates of player deaths (106 of them) gathered in a round of single-player play on the Gulf of Oman map with the 16-player version of the map--so it shows the locations of deaths accrued by 1 human player and 15 bots:

Discussion
The Python code shown above was written to try to clearly illustrate the concepts of this recipie, but will almost certainly need modification for your own use. For example, single pixels are awfully hard to see--it works much better to draw a small cluster of pixels, or even a small icon, for each each point you want to plot.
Also note that this code runs separately from Battlefield 2. It's fast enough that you could probably run it from BF2's Python interpreter, at the end of each round, for example, but it wouldn't be a good idea to run it more frequently than that.
Submitted By
--Woody